Saturday, June 20, 2015

Blender: You think it'd be easy to add an image to an object


So it's time to continue trying to create a game piece in Blender that I can send to a 3D printer.

I've just created a small disc. My next objectives are to give it a little bit of an indent or rim and to try and put an image on top of it.

But first, thanks to everyone for their help and advice in the previous posts. Here's what you've taught me:
  • Check out YouTube and the Blender Foundation for tutorial. The Foundation has a great series on making models that will work for printing
  • When 3D printing, you need a manifold or "watertight" mesh. When you've TABbed into an object and can select its vertices (Edit Mode), make sure you have no vertices selected (hit A, then A again just to be sure. That'll select all, then deselect all). Then choose Select -> Non-Manifold. Blender will tell you if you have illegal geometry (for printing).
  • You'll need to apply the modifiers when you export for 3D printing, but the Export option has a checkbox called "Apply Modifiers", so you can just have Blender do that for you.
  • There are Blender cheat-sheets, including this one: Blender Hotkeys (.pdf)

  • There's a official add-on for 3D printing, that's shipped with the Linux version (which is what I'm using). I need to check User Preferences > Add-ons to confirm it's installed.
    G is the "move selection" hotkey. R is rotate, and S is scale. Holding down Ctrl will let you snap to unit increments as you go (by default - this can be changed).
    The numpad controls your views. You can split your viewport into 4 quarters so you have top, 3D perspective, front, and right views. Like this: http://puu.sh/itYNS/cd88e7be59.jpg
Thanks, +Richie Cyngler, +Adam Schwaninger+Markus Glanzer, +Winchell Chung and +William Black.

---   ---   ---

The easiest next step should be finding out if I can import a .jpg file and map it over one side of the disc. Here's the image I want to map:

It took a little bit of mucking around in GIMP to create this on a transparent 60x60mm layer. A quick check in Blender's File > Import menu doesn't reveal any obvious options for images.

But accidentally pressing CTRL-TAB brings up the Brush menu and a whole bunch of other painting related options. Seems like that might become useful, soon.

Anyway, this short tutorial shows me how to import an image:


Success!


I'm not sure how to move it into the main window, yet. You can't click and drag it.

Further investigation reveals there's an add-on you can activate called 'Import Images as Planes'. The tutorial in that link looked very promising. However, I seem to have simply imported a grey square.


So now I'm wondering if I'm going about this the wrong way. Could I:
  • import the image directly onto a new cylinder, or
  • add the image as a texture to my existing cylinder?
After button-mashing for a bit, I selected the 'Shading' menu and ticked 'Textured Solid', which creates this:


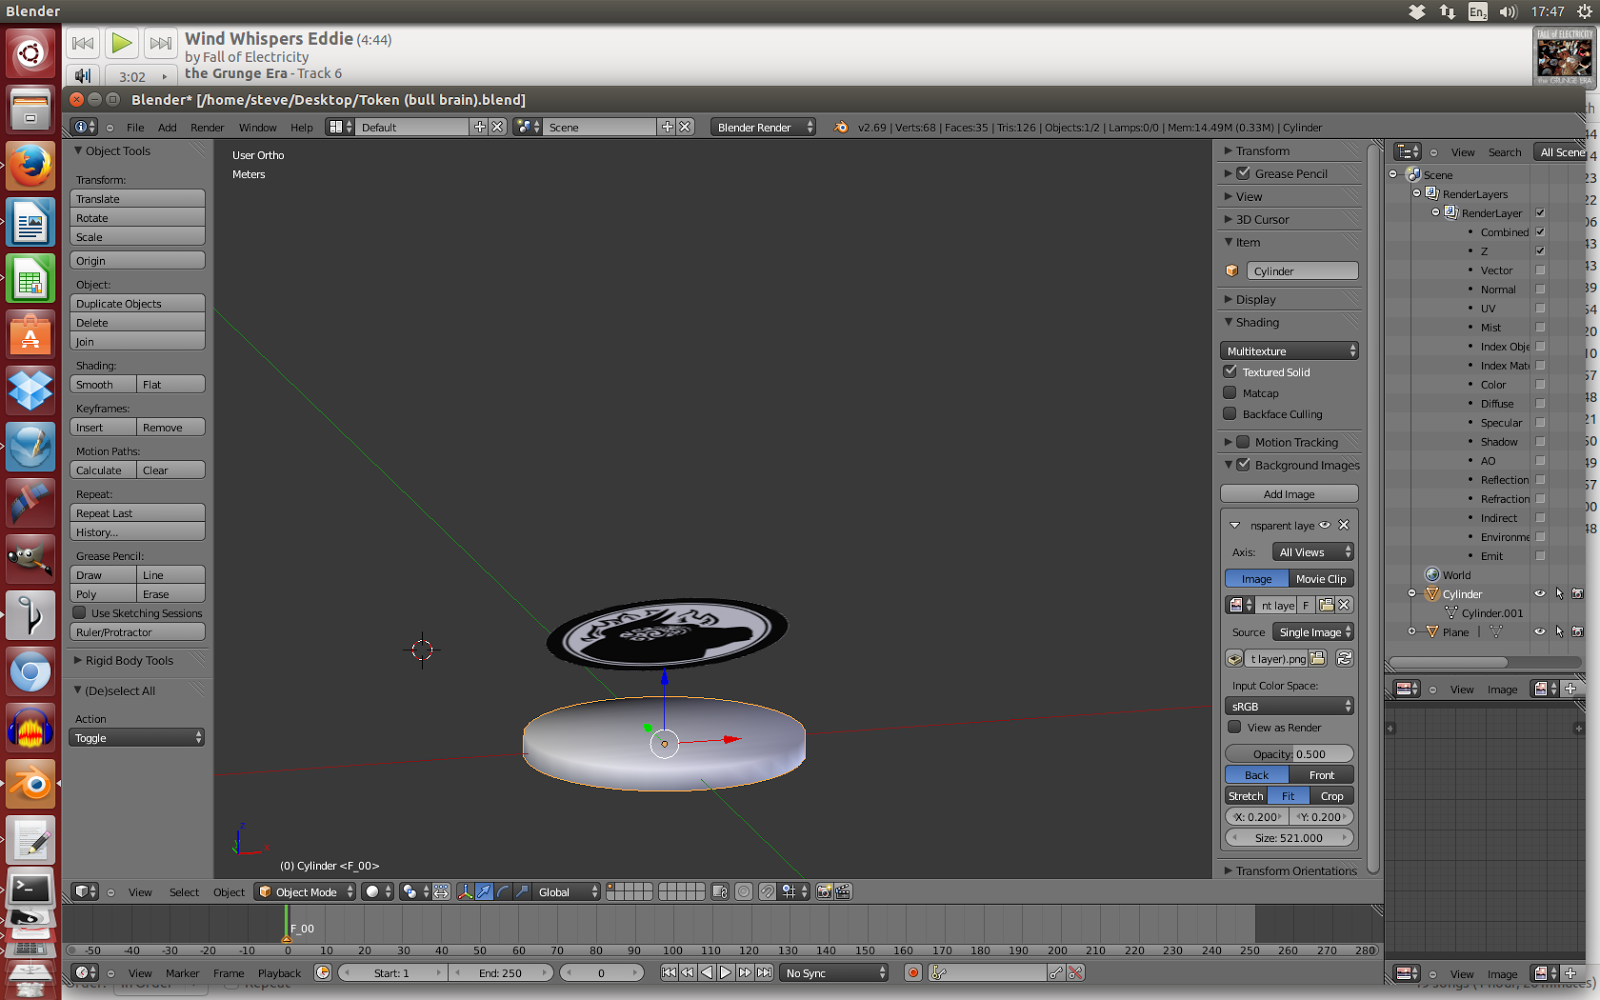
That's pretty close. Now: can I shift it onto the cylinder? ... I've discovered that right-clicking an object selects it. In the 'Object Tools' menu, I can click on 'Translate' and manually shift the image around.

An astounding comedy of error follows, as I accidentally rotate the bull image and shift it 24 metres away from a 39mm large object. After struggling to find and reposition it, I have this:


For my serenity, I walk away for a couple of hours. When I come back, I find (and follow) this crystal clear tutorial, which does exactly what I want:


Following those instructions, I succeed in putting the texture on the disc. You can see it on the right-hand side, below. It's not centred yet, but I'll take the win:


 And that's where I think I'll leave it, for the moment.


Previous posts:
1. Figuring out how to create a 3D object
2. Learning how to create a disc

#ClayTalk

Friday, June 19, 2015

Blender: Learning how to create a disc

I've started teaching myself how to create a 3D object. Last time, I learned how to create a sphere (SHIFT-A > Mesh > UVSphere) in Blender, an open-source 3D graphics programme.

Through a combination of accidental button-mashing, I've learned how to rotate the camera slightly: using the scroll-wheel and different combinations of ALT, CTRL, CTRL-SHIFT.


So, 1.8 goals down. Now to try and figure out how to make a disc and then make it 39mm in diameter and 3mm thick.

Checking the Mesh > Shape options, it looks like 'cylinder' gives me exactly what I want. But the default cylinder is too thick. I want to adjust its dimensions.


There has to be something on-screen that'll let me define that. Looking at the Object tools menu, there's a section that's specifically about the cylinder--and it has categories for vertices, radius, and depth.

Let's see what adjusting the depth does ...


So it looks like adjusting the dimensions is easy. But how do the units that Blender uses correspond to the real world? What is a radius of 1 in millimeters?

Googling 'blender measure' brings up a couple of tutorials and Q&As:

http://www.katsbits.com/tutorials/blender/metric-imperial-units.php

https://blender.stackexchange.com/questions/254/how-do-blender-units-and-meters-feet-or-yards-correlate

It looks like there's something called the 'Scene' tab, which has a 'Units' option in it. And in Units, there should be options for:
  • None
  • Imperial
  • Metric
... but after a thorough look around, I don't see 'Units' in the Scene tab. ... And my attempts to add one lead to frustration and losing all the default toolbars. After restarting Blender I find the Units section they're talking about ... but only by observing which button is highlighted blue at the top of this picture in one of the tutorials):


A small bit of fiddling around later, and I've created a 39x3mm token!


(It's pretty small in this picture.)

Wednesday, June 17, 2015

Blender: figuring out how to create a 3D object

For the last year, I've been realising that I need to learn how to create objects for 3D printing. It feels like it'll be a useful skill within about 1-3 years.

Step 1: Find out what file type you use for 3D objects. Google tells me that they're .obj and and .stl files.

Step 2: Find an open-source programme to create 3D objects. I've chosen Blender.

Step 3: Install and boot up Blender 2.69 ...


Step 4: Try and figure out how to do something. My first two goals will be to rotate the camera and to change this starting square object into a sphere.(*)

(*) This is one of my favourite parts of the learning process:
seeing an overwhelming number of buttons and options, 
and gradually making sense of them.


My experience with teaching myself GIMP and Scribus is that whatever you google for, there's usually a tutorial.

So, after googling I immediately learn that:
  • TAB changes the menus on the side of the screen from 'Object Tools' to 'Mesh Tools'
  • You can select all the vertices of an object by pressing 'A' (and I've learned that the idea of 'an object's vertices' is important)
  • ... and I've learned that there's a 'To Sphere' button somewhere on this screen but that I can also 'sub-divide' the object 100 times.

I can't immediately find the Sphere button, but pressing sub-divide seems to freeze up the programme. After it recovers, I set the smoothness of those subdivisions to '100', which totally explodes the screen:


So, that's not the way. After rebooting my computer, I try it again with different values for smoothness, but sub-division just seems to create a bunch of different spheres bulging out of the original one.

Doing this, though, I learn how to drag the object through 3 dimensions:
  • click on the blue/green/red arrows in the centre of the screen
  • drag the cursor left/right and up/down
Time to find a new tutorial. This 'Build a penguin' one looks like it has some good info.

And success! Pressing SHIFT-A > Mesh > UVSphere creates a sphere I can drag around.

That Mesh menu has tonnes of options, including 'Circle. I wonder if I can create layers of it, to build a disc?

Monday, June 15, 2015

Soth: Frequently Asked Questions

Soth is my game of small-town cultists trying to summon a dark god. It's a cross between Breaking Bad and the stories of H.P. Lovecraft.


Frequently Asked Questions


"What should someone running the game for the first time focus on?"
I'd suggest choosing players for your first game who are:

  • creatively enthusiastic about noirs and villains
  • familiar with the time period and the tropes of Lovecraftian fiction, and/or
  • willing to mine the subtext of trying to pretend to be normal, functional members of the community while plotting murders.

Players with this qualities will add lots of stuff to the game, which will give you time to get comfortable with Soth's rules.

I'd also focus on applying the 'Mask of Sanity' rules and the 'Table Talk' rules. 
Aside from that, I'd focus on portraying the NPCs in ways that make them sympathetic, nosey, hateful, and just generally human.

"How does reputation affect deceiving someone flawlessly?"
If a cultist is deceives someone or covering something up and they pull it off flawlessly, they earn:
  • -1 Suspicion, if their reputation puts them at a disadvantage in the situation
  • -3 Suspicion, if their reputation puts them at an advantage?

Sunday, June 14, 2015

This game gave me a ton of new design ideas


A fortnight ago, I played Ross Cowman's wonder-filled map-game Fall of Magic. In it, a group of travellers cross kingdoms and oceans to discover why magic is leaving the world. In play, our game felt like a Rankin-Bass animated film with Bright Eyes as the soundtrack. We only got 2/3rds of the way through our story of a giant, a raven martyr, a tired hero, and a kin-slayer with a hand ruined by magic.

It will probably be one of the great unfinished games in my life.

Yesterday I (re-)discovered that Jackson Tegu had written Fall of Electricity: The Return of Grunge. It uses the same moving-across-a-map technique to explore the lives of a rock band on a surreal tour through America.


That combines some of my favourite things:
  • Fall of Magic
  • the grunge scene
  • surrealism
  • road trips and tours
Just looking at its characters and the map's finishing point, I immediately want to play it.

But more than that, now that I've seen Fall of Magic, Life on Mars, and Fall of Electricity, I think I understand the potential of this format. A few ideas have already leapt at me, particularly:
  • using the structure to create a choose your own adventure, potentially with plot loops in it
  • a format for the Kafka game I've been trying to write for years - along with a way to involve some online interaction.
Fall of Electricity is available as a bonus game when you buy Fall of Electricity's album 'The Grunge Era' on Bandcamp: https://fallofelectricity.bandcamp.com/

Are there any games that have inspired you to start designing in a new direction?

Saturday, June 13, 2015

Soth: a game of cultists vs investigators is now available

Kicking this blog off with a launch announcement: after years of playtesting and revisions, I've published Soth: a game of cultists vs investigators.

You can purchase it from Payhip: https://payhip.com/b/Ux9O


Over the next few weeks, I'll blog about the process of writing Soth, including the lessons I've learned from publishing this and Left Coast.

I'm starting to think about publishing as a concentric set of skills you need to build up:
  • the writing and the playtesting
  • layout and art
  • the act of launching, which requires courage and allies (and, in my case, video production)
  • marketing, which I think of as finding the people who will really want to play your game and figuring out how to talk to them
  • print (the great unknown, for me, and a whole other set of skills I need to learn)
I know there's stuff I'm missing. What other aspects of the publishing process don't I know about?